Published:
20 Sep 2020
File under:
Automation, Azure, PowerShell, WVD
Azure Image Builder (AIB) is Microsoft’s solution to configure and customize virtual machine images. The concept of it is pretty great: Pick a reference image from the public market place, apply some customization built around HashiCorp’s Packer, hit build and what you are left with is a fully customized template image that can be hosted in Azure as a managed image or a VHD file.
Now, here’s the problem - AIB is still very much in preview and is tricky to set up. There’s lots of great guides on how to set up your tenant to use AIB, but I wanted to try and simplify the initial configuration of your tenant so you can get past the “preview hurdles” and just get straight into building your image templates.
So, I went and published a “helper” module to do just that! Az.ImageBuilder.Tools is a module that will assist you with configuring your tenant to enable the features, custom roles and managed identities required to start playing with AIB.
Let’s dive right in - by the end of this guide, we will be able to:
- Set up our tenant to use AIB and Shared Image Gallery (SIB)
- Build the AIB template from the Win10 EVD (multi session) image from the Azure Marketplace
- Add a customization script to pre-install software to our AIB template
All right - let’s get into it!
Pre-Requirements
Grab the modules
First, let’s install the Az.ImageBuilder.Tools module - this will not only install my helper module, but all other required pre-req modules.
Install-Module Az.ImageBuilder.ToolsAuthenticate to your tenant
Make sure you are connected to your tenant!
#region Connect to Azure
Connect-AzAccount
$azContext = Get-AzContext
$subscriptionID = $azContext.Subscription.Id
#endregion
Enable the features and providers required for AIB / SIG
This one is going to take a minute - run the below command and check back in 15..
Invoke-AIBProviderCheckRun the same command in 15~ minutes to verify the features and providers are registered. If you don’t want to do this step, add -wait to the command. Once everything is ready, you should see the below.
Define the variables
You don’t need to set these up, but c’mon - this guide is clearly setting you up for an automated template process… so let’s go ahead and treat it like that.
$resourceGroupName = 'AIB-ResourceGroup'
$location = 'eastus'
$imageTemplateName = 'Win10-20H1-EVD'
$sharedGalleryName = 'SharedImageGallery'
$imageDefinitionName = 'Win10EVD'
$runOutputName = 'winClientR01'
$imageConfig = @{
    OsState   = 'generalized'
    OsType    = 'Windows'
    Publisher = 'MicrosoftWindowsDesktop'
    Offer     = 'office-365'
    Sku       = '20h1-evd-o365pp'
    Version   = 'latest'
}
A few notes on the variables above:
- The values in
$imageConfigare set specifically for the current build of the Win10 EVD image from the marketplace - don’t change those unless you know there is a new version. - Everything else is fair game -
$resourceGroupNamedefines the name of the resource group you want to put the AIB / SIG resources into - if it doesn’t exist, don’t worry - the next step will sort that out.
Initialize Azure Image Builder (AIB)
Now we need to create the custom roles and managed identity - these are the steps that stop most people from moving ahead - no worry, I’ve sorted it out.
$mIDParams = @{
    AzureContext      = $azContext
    ResourceGroupName = $resourceGroupName
    Location          = $location
    IdentityName      = 'aibIdentity'
}
$managedIdentity = Initialize-AzureImageBuilder @mIDParams
This command will create the resource group if its missing, create a managed identity and apply custom roles required to work with AIB / SIG.

Create the Shared Image Gallery (SIG)
AIB allows us to host our image templates as VHDs or in a Shared Image Gallery - I won’t go into what SIG is here, but for the sake of clarity - SIG is a great solution to store and manage image templates.
$azGalleryParams = @{
    Name              = $sharedGalleryName
    ResourceGroupName = $resourceGroupName
    Location          = $location
}
New-AzGallery @azGalleryParams
Prepare the source image
Ok, we are going to set up the source image and the definitions - nothing too exciting here. The commands and their parameters should be self-explanatory.
# create the source image
$srcObjParams = @{
    SourceTypePlatformImage = $true
    Publisher               = $imageConfig.Publisher
    Offer                   = $imageConfig.Offer
    Sku                     = $imageConfig.Sku
    Version                 = $imageConfig.Version
}
$srcPlatform = New-AzImageBuilderSourceObject @srcObjParams
# create the image definition
$imageDefParams = @{
    GalleryName       = $sharedGalleryName
    ResourceGroupName = $resourceGroupName
    Location          = $location
    Name              = $imageDefinitionName
    OsState           = $imageconfig.OsState
    OsType            = $imageConfig.OsType
    Publisher         = ([mailaddress]$azContext.account.id).Host
    Offer             = $imageConfig.Offer
    Sku               = $imageConfig.Sku
}
New-AzGalleryImageDefinition @imageDefParams
# create the distributor object
$distObjParams = @{
    SharedImageDistributor = $true
    ArtifactTag            = @{ tag = 'dis-share' }
    GalleryImageId         = "/subscriptions/$subscriptionID/resourceGroups/$resourceGroupName/providers/Microsoft.Compute/galleries/$sharedGalleryName/images/$imageDefinitionName"
    ReplicationRegion      = $location
    RunOutputName          = $runOutputName
    ExcludeFromLatest      = $false
}
$disSharedImg = New-AzImageBuilderDistributorObject @distObjParams
Add customization
Here’s the secret sauce - you can add as many customization objects as you want to this. It’s documented well - go check it out. But for now, I’ve hosted a simple PowerShell script on GitHub and I’m going to use that as my single customization step.
# Add customizer step
$imgCustomParams = @{
    PowerShellCustomizer = $true
    CustomizerName       = 'MountAppShareAndRunInstaller'
    RunElevated          = $true
    scriptUri            = 'https://raw.githubusercontent.com/tabs-not-spaces/Az.ImageBuilder.Tools/master/Samples/AppInstall.ps1'
}
$customizer = New-AzImageBuilderCustomizerObject @imgCustomParams
Combine all the ingredients..
Now we have our shared image gallery, source object, distributor object, image definition and customization steps - let’s add them all together and prep the template.
# Create AIB Template
$imgTemplateParams = @{
    ImageTemplateName      = $imageTemplateName
    ResourceGroupName      = $resourceGroupName
    Source                 = $srcPlatform
    Distribute             = $disSharedImg
    Customize              = $customizer
    Location               = $location
    UserAssignedIdentityId = $managedIdentity.ResourceId
}
New-AzImageBuilderTemplate @ImgTemplateParams
This is going to take a little while - around 10 minutes. Keep an eye on the status of the task with the following command.
Get-AzImageBuilderTemplate -ImageTemplateName $imageTemplateName -ResourceGroupName $resourceGroupNameBuild the template
Everything is ready - now we just need to kick off the build - again, this is going to take a while. From my experience, I’ve found it takes anywhere from 15 minutes to an Hour - it entirely depends on what customization options you are adding.
# Start the template build task
# check back on the $job variable for the build status
$job = Start-AzImageBuilderTemplate -ResourceGroupName $resourceGroupName -Name $imageTemplateName -AsJob
If your customization script stalls or is written in a way that can’t bomb out elegantly, you may find yourself in a situation where the build process stalls - the image builder template process will time out after 4 hours by default. This can be changed.
While this step is running, you can monitor the process in one of 3 ways.
- check on the status of the $job variable - while it’s running it’ll advise you. Same for when it’s completed.
- Check the build status directly from the AIB API
Get-AIBBuildStatus -AzureContext $azContext -ResourceGroupName $resourceGroupName -ImageTemplateName $imageTemplateName
- Finally, you can check the VERY verbose logs of packer - jump into your resource groups list - you’ll see a new resource group similarly named to the resource group you defined at the start of this guide.
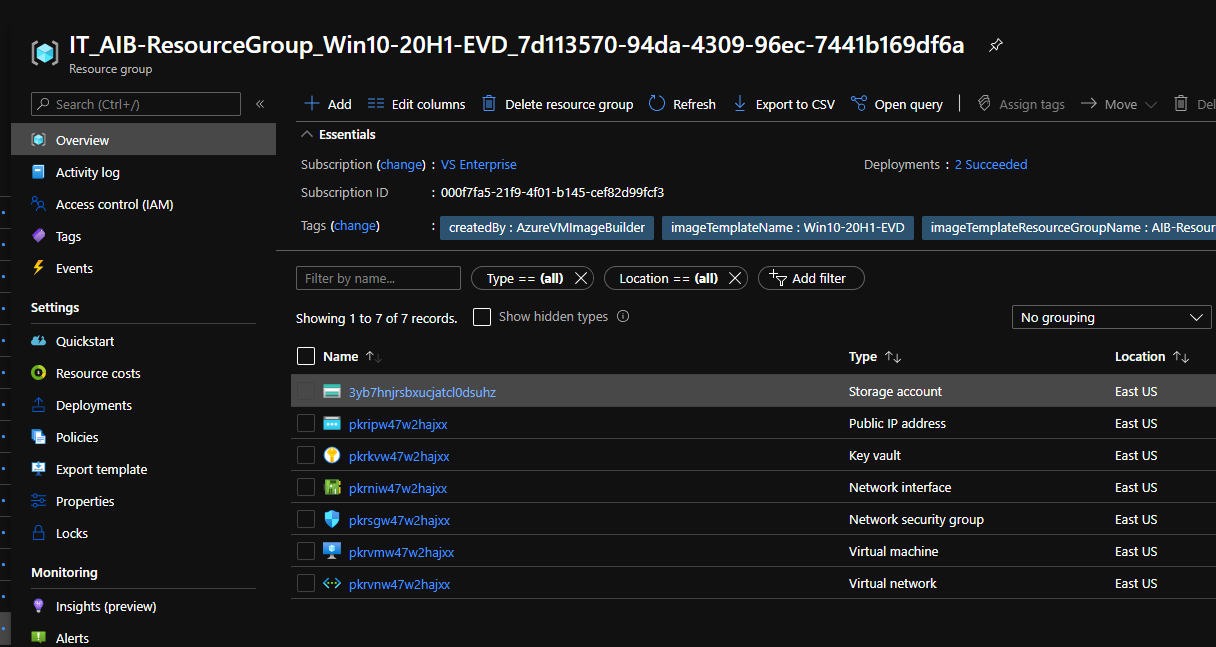
- Inside the storage account, there will be a container named packerlogs. click through the packerlogs container and the internal randomly generated folder and monitor the customization.log file. There’s good documentation on this, and it’s going to help you out if you need to troubleshoot your customization script.
Once your template is built - you are done! You now have a customized template that you can use to build out virtual machines… or if you are paying attention - session hosts for Windows Virtual Desktop!
Stay tuned for a post on how to build WVD session hosts using AIB and PowerShell!
As always, sample code used in this guide are available on GitHub.
— Ben